
How can I use my Keras model with ML Kit?
Keras is an open source neural network library written in Python, which is capable of running on top of TensorFlow (this will be our case).
It’s the go-to library for building neural networks with ease. It abstracts the details of TensorFlow, while being fully compatible with it. If you start learning neural networks, you will find yourself using it more and more.
In this article, we will look at one of the basic examples from the Keras repository: mnist_mlp.py which I have adapted in this Jupyter Notebook: Keras Sample.
In this example, the Keras authors have created a model that is capable of reading hand-written digits from MNIST dataset, which is a widely used dataset for Machine Learning. I used it in my Face Generator project.
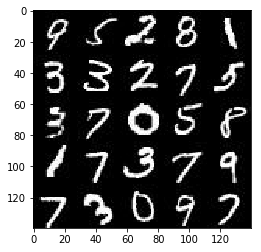
Sample data from MNIST
Looking into detail, this is the model creation with Keras:
model = Sequential()

model.add(Dense(512, activation='relu', input\_dim=784))
# model.add(Dropout(0.2))
model.add(Dense(512, activation='relu'))
# model.add(Dropout(0.2))
model.add(Dense(num\_classes, activation='softmax'))

model.summary()
This builds a simple, three layer model, with three fully connected layers, with an input dimension of 784, and has a final output for 10 classes (defined by num_classes). On a side note, I have commented out the Dropout from the original sample, more on why later.
Training the model
The training step can be found in the Jupyter Notebook: Keras Sample.
The results can be seen here:
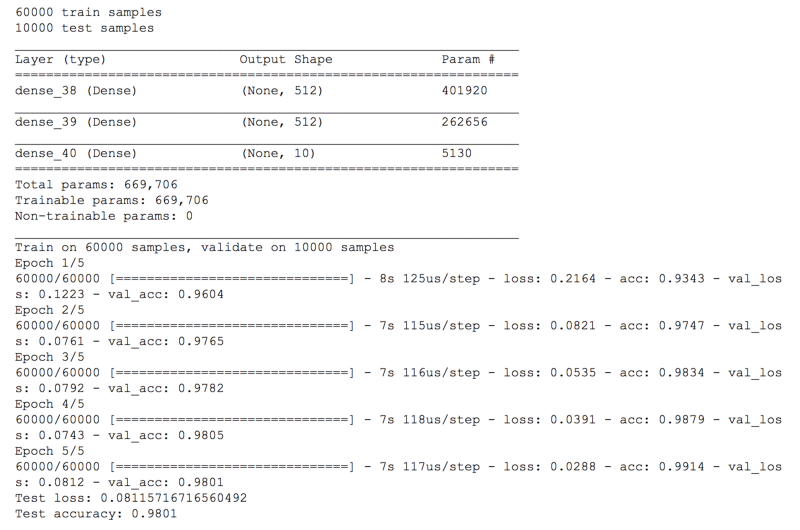
The model has an accuracy of 0.98, which is not excellent but works for our example. I trained the model only for 5 epochs, and since I removed the Dropout layers, the accuracy is slightly worse than in the original example.
Exporting a Keras model
Once we have finished training the model , we can export our Keras model to TF Lite. We use the same process seen in Exporting TensorFlow models to ML Kit but with an extra step:
We need to “wrap” our Keras model with an input tensor, then obtain another output tensor. We use these tensors as the input and output on ML Kit.
Before calling to freeze_session, I define a TensorFlow placeholder of shape (1, 784), which will work as our input tensor, then I take the model we have created with Keras, and call it with our input tensor. The result is our output tensor.
Secondly, we call to the freeze_session method that I presented on my previously linked article, but this time with K.get_session(), which returns the TensorFlow session from the Keras backend.
Finally, we pass the input and output tensors that we just created to the toco_convert method, and we store the model, with the frozen variables, in a tflite file.
However, the original model used Dropout which seems not supported by TF Lite at the moment. I had problems exporting the original model, once I removed the dropout layers it worked. I expect this to work in future versions of TensorFlow.
Running on a Google Colab
You can run this same Jupyter Notebook on a Google Colab for free, even with GPU acceleration. To do so, download and open the linked notebook with Google Colab.
If you want to export the model from Google Colab, you can do that by changing the file path on the export step and calling to files.download.
This triggers a file download on your browser.
from google.colab import files
open("nmist_mlp.tflite", "wb").write(tflite_model)
files.download(’nmist_mlp.tflite’)
Running the exported model on Android
Let’s jump into Android Studio to see our model in action.
You can open the Activity in charge of running this model here: MnistActivity.kt
This time we have an input shape of 1x784 (which corresponds to a 28x28 pixel picture).
Our ouput is a 1x10 array, corresponding to the 10 categories our model can classify (numbers from 0 to 9).
So we need to adapt our input and output configuration, as explained in the article Custom TensorFlow models on ML Kit: Understanding Input and Output.
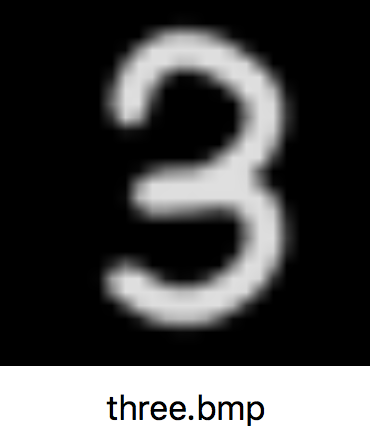
To test this, I wrote by hand a number 3, inverted the colors and converted it to a greyscale bitmap:
Secondly, we need to load the bitmap and convert it to a single array of floats in the range of 0 to 1:
Now that we have the input, is time to run the model:
interpreter.run(inputs, dataOptions)
    .continueWith { task ->
         val output = task.result.getOutput<Array<FloatArray>>(0)
    }
When I check the output array, I get the following results:
7.771087E-15,
3.1033683E-13,
1.7879811E-9,
**0.9999988,**
3.5368996E-16,
5.594893E-7,
8.98838E-16,
3.1935377E-12,
5.8121117E-7,
3.0227494E-9
As you can see, we got a 0.999 on the position 3 of the output array, which corresponds to the category number 3! Our model works on Android!
Want to learn more Android and Flutter? Check my courses here.