
This is the result of some trial and error until I got a simple annotation processing example working, with the challenge of not using Java, but Kotlin instead. Hopefully will help you get started!
Sample code here: https://github.com/miquelbeltran/kotlin-code-gen-sample
The goal is to generate a new class with the method getName() which will return the String “World”.
So if we annotate the class Hello, it will generate the class Generated_Hello, and it will contain the method getName() that returns “World”.
PS: You can jump directly into Building the processor for the good stuff.
The main method prints “Hello World”
Setup
First step is to setup your project. I went with a pure Kotlin project directly with IntelliJ IDEA.
In the root folder we won’t have any code, instead, create two modules inside the root folder, one that will contain our processor and another one that will contain our main code.
It’s important to do so, because you need to compile & process the processor before our main module!
On the root we will have two files: a build.gradle and a settings.gradle
We will have two modules: generator and sample-main
Let’s create the sample-main first:
- Create a Kotlin module with Gradle on IntelliJ
- Create a package folder (in my case
work.beltran.sample) - Add an empty Kotlin file
Main.kt
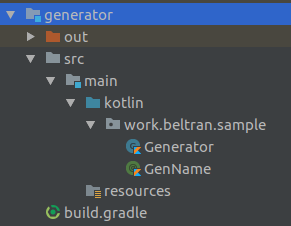
 Expect a structure similar to this one
So far not much for a setup, we will go back to the Main.kt and the build.gradle later, let’s create the generator now.
Similarly, create a new module named generator with a package structure and add two Kotlin files:
- A class file called
Generator - An annotation called
GenName
GenName is going to be our custom annotation. It will be a simple annotation without extra parameters. The way to create an annotation in Kotlin is by adding annotation in front of class.
We will look at the Generator later, now back to the main module.
Main module code
On the Main.kt, create a class named Hello and annotate it with your new annotation.
Secondly, generate a main method (you can just type main and hit Enter) and add a call to the Generated_Hello (which does not exist yet).
As you expect, the project will fail to resolve both GenName and Generated_Hello. So far it’s OK.
Now we will add the module dependency for GenName.
On the main module build.gradle, you will have to add the dependency to the generator module, both as kapt and compileOnly.
There are two more tweaks you will need:
- Add
generateStubs = trueso we can refer to the generated classes (using Generated_Hello from our main method) - Add the
sourceSetspointing to thekotlinGeneratedfolder, so IntelliJ also sees the generated code (actually not required if you just build via command line gradle)
Hi! This is Miquel, the author of the post. I hope you like what you are reading!
If you are looking for a freelance Android developer, look no further!
Check: http://beltran.work/with-me and I’ll be happy to chat with you!
Building the processor
Everything except our annotation processor is ready, let’s build it.
First, create a class that will extend AbstractProcessor:
class Generator: AbstractProcessor()
Our processor needs to implement the following methods:
getSupportedAnnotationTypes: We tell the processor which annotations can we process. In our case just**GenName**.getSupportedSourceVersion: Which returns the source level supported version. I’ve found that leaving it as default won’t work and instead I need to returnSourceVersion.latest.process: Here’s where the real work goes. What we need to do here is to actually generate the new source code and store it somewhere. In my example I use**KotlinPoet**to generate the class and then I use thekapt.kotlin.generatedoption to get the output folder.
Going step by step:
- On
process, we will iterate over each annotated element, and we will use the class name and the package name to generate the resulting code. You can read more properties here to generate your code. - On
generateClasswe are building the file and storing it. With KotlinPoet we create a new**FileSpec**, which includes a class with a functiongetNamethat returns “World”. - Finally storing it into the
**kaptKotlinGeneratedDir**.
Two important notes:
- You can print logs on the build process, which is heavily useful!
- As well, you can throw exceptions that will stop the build process. Also good to be sure no one is misusing the annotation.
One more thing: AutoService
In order to kapt to run our processor, we need to add a **META-INF** into our generator module indicating our processors. However AutoService from Google will generate this for us. Go for it and use it!
Also don’t forget, we need to add it to the generator build.gradle
At the time of this article, 1.0-rc3 did not work, so I had to step back to 1.0-rc2.
Let’s build and check our generated file:
If everything is alright, now you can run the main method, and you will see Hello World printed on the terminal.
Hello World
Process finished with exit code 0
Summary
- Create two modules: one for your generator and one for your main code
- The tricky part is getting the gradle configuration right for both modules, pointing to the generated source files, generating stubs and the kapt dependency
- Don’t forget to generate or include the META-INF. That was one of my first mistakes. Nothing will be processed if it is missing
- In case of doubt, use logs/exceptions on your processor
- Sample code here: https://github.com/miquelbeltran/kotlin-code-gen-sample
References
- KotlinPoet: https://github.com/square/kotlinpoet
- Here I found how to store the new Kotlin file: https://github.com/square/kotlinpoet/issues/105
- and https://github.com/JetBrains/kotlin-examples/blob/master/gradle/kotlin-code-generation/annotation-processor/src/main/java/TestAnnotationProcessor.kt
- Google’s AutoService: https://github.com/google/auto/tree/master/service